
Challenge
Configure your Dentrix settings on the RDS Dentrix Servers.
Cause
Some settings cannot be configured automatically and this guide will take you through what needs to be done.
Solution
1: SETTING YOUR BATCH PROCESSOR TO SHOW ONLY YOUR SITE’S REPORTS
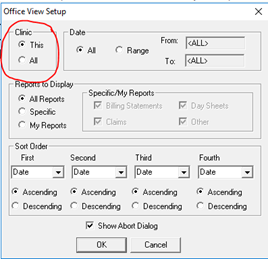
- From the Office Manager, click on View.
- Click on All in the Clinic box.
- Click on OK.
- Click on View
- Click on This in the Clinic box.
- Click on OK.
__________________________________________________________________________________________________________________________________________
2: SETTING YOUR DIRECT PRINT OPTIONS IN THE LEDGER
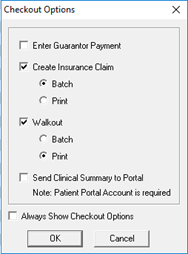
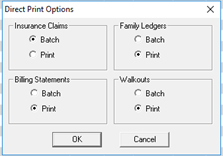
If your insurance claims are printing instead of going to the batch, check these two things in your LEDGER:
1. Go to File and then Set Checkout Options. It should look like this:
2. Go to File and then Direct Print Options. It should look like this:
__________________________________________________________________________________________________________________________________________
3: SETTING DENTRIX UP TO SEARCH FOR ALL PROVIDERS IN ALL CLINICS
- Log into Dentrix
- Go to the Ledger.
- Click on the Select Patient icon on the toolbar.
- Type in the last name of any patient.
- Highlight the patient name and click OK to select that patient.
- Click on the Enter Procedure icon on the toolbar.
- Click on the double arrow to the right of Provider (see arrow below).
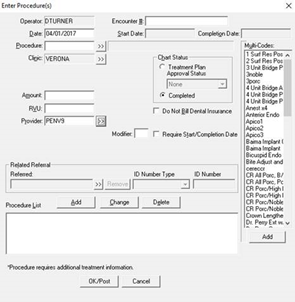
- Click on the circle by All Clinics.

- Click on Cancel.
__________________________________________________________________________________________________________________________________________
4: SETTING DENTRIX UP TO SEARCH FOR PATIENTS IN ALL CLINICS
- Log into Dentrix.
- Go to the Family File.
- Click on the Select Patient icon on the toolbar.
- Click on the circle by All Clinics.
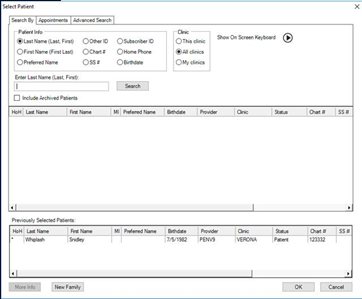
- Click on Cancel.
__________________________________________________________________________________________________________________________________________
5: SETTING YOUR OFFICE JOURNAL TO DISPLAY INFO FROM ALL CLINICS
- Click on any appointment in the appointment book.
- Click on the Office Journal icon on the toolbar.
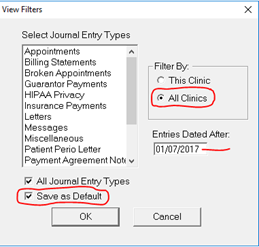
- Click on the View Filters
- Click on the circle by All Clinics (in red below).
- Click to select Save as Default (in red below).
- Click OK.
Please note that the Office Journal defaults to show info. from 90 days prior to the present day. You can change that date in the View Filters window also. This will default back to 90 days for each patient, so you have to change it every time if you want to see information prior to 90 days.
More Information
ENTER MORE INFORMATION IF APPLICABLE - i.e. - Please remember to close out all applications before leaving for the day.
Comments